Maze Generation using Prim's Algorithm
Last week, I was working on a game project that required a maze generator. I decided to write a simple maze generator in Go. In this post, I’ll share the code and explain how it works.
My code is in GO but I’ll explain with pseudo-code so that you can easily implement in any language.
Prim’s Algorithm
There are many algorithms for generating mazes, but one of the simplest and most efficient is Prim’s algorithm.
Prim’s algorithm is a popular algorithm for generating perfect mazes. A perfect maze is a maze with no loops and no isolated areas, i.e., you can visit any point in a maze and there is only one path to any endpoint.
The algorithm works by starting with a grid of cells and repeatedly selecting a random cell and connecting it to the maze. It continues until all cells are connected.
Main terms
To implement this algorithm, you’ll need to understand the following terms:
- Grid: 2D grid representing each cell in a maze with Cell
- Cell: A point (x, y) in a grid that can be either Path or Wall
- Path: A point you can visit
- Wall: A point you cannot visit
- Frontiers: A list of Wall cells that are adjacent to Path cells in 2 units distance
+---+---+---+---+---+
|   |   | W*|   |   |
+---+---+---+---+---+
|   |   | w |   |   |
+---+---+---+---+---+
| W*| w | P*| p | p |
+---+---+---+---+---+
| w | w | p | w |   |
+---+---+---+---+---+
| w | w | W*| w |   |
+---+---+---+---+---+

W* - Frontiers
P* - Current path
w - Wall
p - Path
In the above example, the frontiers of the cell P* are W* cells. The algorithm randomly select a wall from the frontiers and connect it to the path.
Pseudo-code
- Mark all cells as
WALL - Mark a starting cell as
PATH(you can choose any cell as the starting cell) - Add the frontiers of the starting cell to the list
walls - Keep track of added cells in
walls(or use a set for frontiers list if you can) - While
wallsis not empty:- Randomly pop a wall from
walls- W - Get a list of
PATHcells adjacent to the selected wall (like in frontiers selection) - Randomly select a
PATHcell from the list - P - Connect the selected
PATHcell to the wall (i.e, mark the wall between W and P asPATH) - Add the frontiers of the current wall W to the
walls - Mark the current wall W as
PATH
- Randomly pop a wall from
Go code
Here’s the above algorithm written in Go. You can see the actual implementation in this repository.
In this code, I’m using a map to keep track of visited cells. I’m also tracking the furthest point from the starting point to set it as the end point.
func (p *PrimGenerator) Generate(maze *Maze) {
	start := maze.GetStartPos()
	curr := start

	walls := maze.GetFrontiers(start.x, start.y, true)
	visited := make(map[Cell]bool)
	for _, wall := range walls {
		visited[wall] = true
	}

	for len(walls) > 0 {
		wall := walls[randIdx]
		walls = append(walls[:randIdx], walls[randIdx+1:]...)

		if maze.Get(wall.x, wall.y) == PATH {
			continue
		}

		paths := maze.GetFrontiers(wall.x, wall.y, false)
		if len(paths) == 0 {
			continue
		}
		path := paths[rand.Intn(len(paths))]

		maze.MakePath(wall)

		neighbors := maze.GetFrontiers(wall.x, wall.y, true)
		for _, neighbor := range neighbors {
			if !visited[neighbor] {
				visited[neighbor] = true
				walls = append(walls, neighbor)
			}
		}

		// finding the furthest point
		if wall.Diff(start) > curr.Diff(start) {
			curr = wall
		}
	}

	maze.SetEnd(curr.x, curr.y)
}
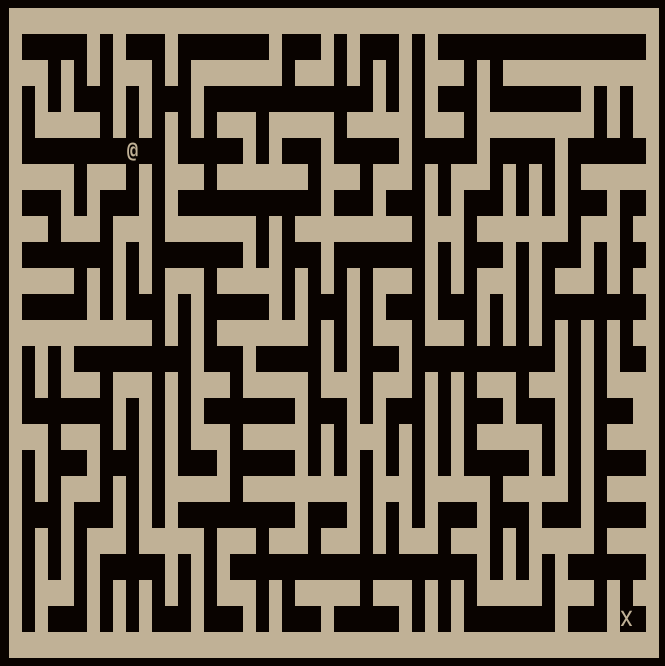
This is the generated 50x25 maze.

This algorithm is very simple and easy to implement. The only downside is that it generates mazes with many short paths. You can notice some of them in the above screenshot.
That’s all for this post. If you have any questions or suggestions, feel free to comment below.
Happy coding!